** As always, I feel the need to mention that it's not necessary to use all the same colors that I do, my tutorials are just for a basic reference to help stir your imagination! You can also use acrylic paints as an alternative to nail polish because there are a HUGE range of colors and each bottle is under $2! BUT, in my personal opinion I feel that nail polish lasts longer and doesn't chip or peel as easy as acrylic paint. **
Now if you're anything like me, just the thought or sound of hair extensions is enough to get you all hot and bothered! Or is that just me? Hmmm...
I digress.
Anyways, if you are on the hunt to get hair extensions, I'm sure you've done your research and seen every type of extension method possible. It's a confusing world and there's so many varied opinions on each method that it feels like you're not making any progress in picking a method, trust me, I've been there, done that. I'd like to point out that I've really only tried two methods, the metal microlinks, and the strand by strand ManeMaxx (and dabbled in the clip-in world).
After many months...actually...what turned out to be roughly 2 years worth of research, I'd heard so many positive and so many negative reviews on strand by strand keratin bonds that I just couldn't make up my mind on what method to use. I had heard horror stories about the stylist taking out the extensions and entire chunks of hair falling out from the scalp! Definitely NOT something I'd look forward to when getting extensions! I finally stumbled across ManeMaxx by Googling "natural hair extensions." I ended up stalking Tiffany's website for well over 6 months umm-ing and ahh-ing over whether or not to get these extensions, I hadn't seen a single review posted on this method so I was very hesitant to say the least. I decided to take a leap of faith and test ManeMaxx out...and am I ever glad I did!
While I haven't tested out a ton of other methods, I am completely happy with ManeMaxx :) You may be able to tell after the numerous videos I`ve posted on YouTube about it!
I could honestly go on forever talking about ManeMaxx and why I love it, but instead...I`ll let you watch my videos and break it down to a quick pros vs cons.
Pros:
- Non-damaging extensions
- No chemicals to use when removing your bonds
- Virtually undetectable bonds
- Wears SUPER comfortably, can't even tell you have extensions in
- Affordable. After the initial investment, all you need to maintain or do continuous installs is the bond and new hair
- DIY means no need to schedule appointments or pay for maintenance
- Very natural look and wear
Cons:
- High learning curve
- Need to have lots of patience for installs
- Uninstalls a bit messy with all the bond fall out
As you can see I'm very PRO ManeMaxx, the method itself is great, the only "issue" I can complain about is the initial learning curve for installing, once you have around 30-50 bonds in, you start to get the feel of what-to-do and what-not-to-do. Yes, the first install is a pain, but if you intend on wearing hear extensions for more than one install, this method will save you oodles of money! And that to me...is worth it in the end...the more money saved means the more I can spend on hair products ;)
So if you're thinking about trying out the ManeMaxx method but still looking for more detailed information on the method, be sure to check out the rest of my ManeMaxx videos posted on my YouTube channel http://www.youtube.com/user/darkempriss?feature=mhum as well as the official ManeMaxx website and YouTube channel.
Nope, not affiliated or sponsored by ManeMaxx, just happen to love their products :)
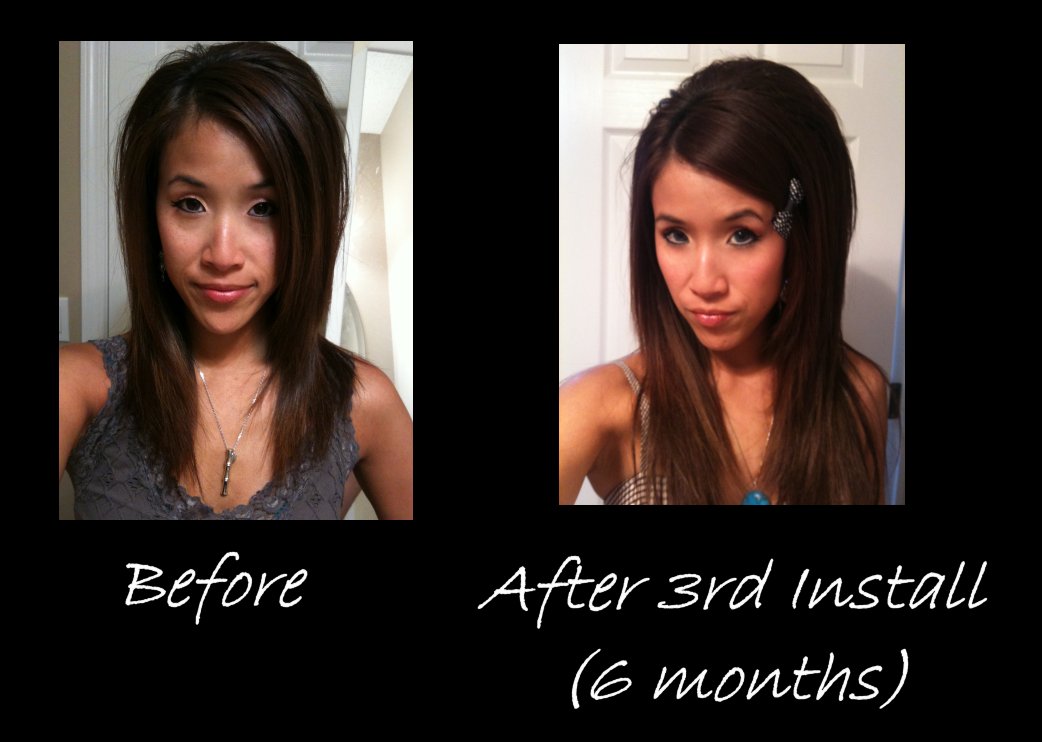
Here are some before and after pictures of my hair growth while using the ManeMaxx extensions.
As the first snowflake falls, there is no question that winter is upon us...and while we can't do much about the weather and wish it away, we can certainly jazz up our nails and make this season a little more bearable!
What you'll need:
- Blue nail polish
- Black nail polish (nail pen works best)
- White nail polish (nail pen works best)
- Orange nail polish (nail pen works best)
** As always, I feel the need to mention that it's not necessary to use all the same colors that I do, my tutorials are just for a basic reference to help stir your imagination! You can also use acrylic paints as an alternative to nail polish because there are a HUGE range of colors and each bottle is under $2! BUT, in my personal opinion I feel that nail polish lasts longer and doesn't chip or peel as easy as acrylic paint. **
You gotta love smart, yet affordable innovations...and Goody Spin Pins my friends are exactly that! These spin pins claim to do the work of 20 bobby pins and they're not lying! It takes just two pins to secure your bun and holds it securely in place all day.
Now they're called spin pins for a reason, when you insert them into your hair and take them out of your hair, you literally have to spin/twist them in/out, once spun into your hair, you can try remove them by pulling them out but they will not budge!
I wore these faithfully during my trip to Turks & Caicos and wore them even during my ventures into the salt water. These pins stood up against the test of time and did not rust one bit. I'd have to say these pins have been a great investment for only $8 CDN...give up 2 of your daily lattes and you've got some great little pins to last almost a lifetime!
Blue eyes, green eyes, brown eyes, hazel eyes...oh wait, I don't have hazel eyes...until now! *Insert evil laughter here*...wait...wrong moment...Aaaanyways, it's been awhile since I've switched up my eye color and I've gotta say, I'm kind of over the big dolly-eyed effect that my previous circle lenses gave me, I just want to change the color of my eyes! This is where the EOS Circle Lenses come in.
The diameter is a straight 14.0 mm instead of 14.5 mm (I think) and I have to say I like the overall effect! It feels like these EOS lenses wear more comfortably for me compared to the Geo lenses. This time around I ordered from www.ilovecirclelenses.com, the lenses were $20 and shipping was only $3.75, can't beat that deal! Have a look at the pics below to see what these lenses look like :)
This is my go-to nail look when I'm having a creative block. Hope you enjoy :)
What you'll need:
- Blue nail polish
- Pink nail polish
- Yellow nail polish (nail pen works best)
- Orange nail polish (nail pen works best)
- Green nail polish (nail pen works best)
- Black nail polish (nail pen works best)
** As always, I feel the need to mention that it's not necessary to use all the same colors that I do, my tutorials are just for a basic reference to help stir your imagination! You can also use acrylic paints as an alternative to nail polish because there are a HUGE range of colors and each bottle is under $2! BUT, in my personal opinion I feel that nail polish lasts longer and doesn't chip or peel as easy as acrylic paint. **
Time to get naked people! And of course by that I mean Urban Decay's naked palette ;) I managed to get my hands on one of these after much searching and stalking Sephora's website...and I have to say it was totally worth it! This palette not only comes in a gorgeous slim, velvet case, but it includes 12 full size neutral eyeshadows, a dual side 24/7 eyeliner in their two most popular shades (Zero & Whiskey) and a mini UD Primer Potion...everything you need to get naked is included in this sexy little palette :)
I think this is a must-have staple in your makeup collection (or if not this exact palette but something close with gradient neutral shades including a black and silver), you can create hundreds of looks that range from office appropriate to smokin' and club worthy. These eyeshadows are highly pigmented and have a buttery smooth texture for easy blending.
Aside from the shadows themselves, I really love the look of this palette, I find myself reaching for this almost every single day, and even the days that I don't, it still adorns my vanity as a sleek, sophisticated accessory.
Overall, the value of this palette is unmistakable! The presentation, packaging and general use is well worth the $50 (make that about $60 for us Canadians!) and I don't think you can find anyone out there that wouldn't want this in their beauty arsenal!
Got the bad hair blues? Is your hair flat and dull? Look no further than to White Sands innovations to save the day! I finally broke and decided to do a small haul at Flat Iron Experts to test out the highly recommended White Sands Stuck Up Mega Hold Hairspray & Liquid Texture in Firm Hold. I have to say that I'm pretty impressed with both of these products as they definitely live up to their claims.
I have to say I was pretty skeptical when it said that you can brush out your hair without leaving any white residue behind...especially after seeing some of the crazy hairstyles that can be created with the Liquid Texture, but let me tell you this was all true!
I purchased the hairspray for $20 USD on the Flat Iron Experts website, and the Liquid Texture was about $15 USD. Now I'm about halfway in between being a drugstore junkie and a department store addict (meaning I buy drugstore brands about as often as I buy higher-end brands), but with my hairspray addiction...$20 a bottle runs a bit high for me, and considering I go through about a can a month...that definitely adds up! So I did a bit more hairspray hunting after I did this review and found a suitable replacement at a fraction of the cost....wait for it...TREsemme's TRES Two Extra Hhold Hair Spray .
Tres Two runs about $4 a can and has all the great properties that the White Sands hair spray has...
- Firm, yet flexible hold
- It's an Aerosol (I know it's bad for my carbon footprint...but it's an addiction people)
- Brushes out without leaving a white residue
Now when I use hairspray...I OVER use it, so when this Tres Two spray doesn't leave a white residue when you brush it through...trust me when I say it's been tried and tested! Anyways, check out the video for some proof :)
Another spring/summer nail tutorial that's sure to please and (fairly) easy to do! Another simple variation to make this look more "flower-y" is to make the petals flowers circles instead of straight lines.
What you'll need:
- Black nail polish
- White nail polish (nail pen works best)
- Pink nail polish (nail pen works best)
- Yellow nail polish
** As always, I feel the need to mention that it's not necessary to use all the same colors that I do, my tutorials are just for a basic reference to help stir your imagination! You can also use acrylic paints as an alternative to nail polish because there are a HUGE range of colors and each bottle is under $2! BUT, in my personal opinion I feel that nail polish lasts longer and doesn't chip or peel as easy as acrylic paint. **
This is my go-to style whenever I have curly hair and I'm either too lazy to re-style for the day...or I didn't have time to wash my hair the night before! Funny thing is that I receive more compliments on this style than any other...little do they know my secret ;)
Cute & cheap...what better two words to pair together in the human language than these two!? AND if you tag on FREE shipping...well that's just a word sandwich of awesomeness...yeah...I know that makes no sense :p
As you know, I'm quite lazy, and that makes it very difficult to go shopping for clothing, so I started by purchasing a few things on eBay and it just so happens that one of those sellers referred me to this website (www.jpstyle4u.com). Not only does this website sell cute clothes are cheap...er...reasonably priced, shipping anywhere in the world is FREE. F. R. E. E.! Can't beat that value can you? And to top it all off...there's no minimum order so order as few or as many pieces of clothing as you'd like ladies :)
This website sells clothing, shoes, boots and on occasion...hats & accessories. And just for sizing reference, I'm 5'2 & 100 lbs and the small sizes run a wee bit big on me.
As you folks know by now, it has been my lifelong quest to find different methods to getting BIG hair (the bigger the better!). I can't remember how but I stumbled upon these snazzy little devices by accident and decided to give them a try. They are a great alternative to back-combing the heck out of your hair because this method is definitely less damaging to your hair...in fact...it's not damaging at all!
What? Big hair without damaging your actual hair? It's a crazy thought I know but it's true! These clips basically put a "crimp" into your hair to boost the texture of your hair and...should you still choose to back comb it...provide a good grip to make that rat's nest! (or is bird's nest?). These clips are best used on wet hair because it helps the crimp stay in your hair better from "wet to set" for a longer-lasting style. These clips are very easy to use, but just a little bit time consuming for the whole process. Once your hair is wet, I would recommend using a spray gel to help set the crimp in your hair.
- With wet hair, insert these clips one-by-one, starting at the crown of your hair. From the top down, insert 3 clips, the 4th clip will be inserted underneath to help secure these all in place.
- Insert each clip one by one on the sides and working your way down until you run out of clips.
- Either wait for your hair to air dry (which takes approximately 4 hours + depending on the thickness of your hair), or speed up the process by using a hair dryer.
- Make sure hair is 100% dry (or you'll risk your crimps flattening out), and remove clips one-by-one, for the most part, each clips should slide right out of your hair unless you've managed to tangle them in with your hair.
- Straighten a small section of your hair over top of all the crimped layers, gently tease the crimped section and finish hair with a finishing spray.
You'll have some awesome volume that lasts until you wash it out...which should be approximately 3 days max unless you're dirty and don't wash your hair very often ;) From here you can do the "bounce" test where you pull all your newly formed volume flat down on your head, release, and watch it bounce back up!
I bought my clips from www.j-clips.com or you could probably find these on eBay. These clips claim to work on all hair types, but I think for fine hair, you might need a little more help with some product. Check out the website for some helpful instructional videos as well :)
I was silly and didn't take before and after pictures, so you're left with a side-by-side video screen shot comparison below, happy big hair hunting!
Oh summer! The loveliness it brings...along with warm breezes, bright days and...BUGS! Here's an ode to my favorite summer bug (ok ok, possibly the ONLY bug I actually don't mind) and what better way to express it than through artistic expression on my nails! This is a fairly simple design once you get the hang of it...why express yourself with a french manicure when you can paint cute & colorful bugs all over your nails!
What you'll need:
- Base coat (I use OPI Nail Envy Nail Strengthener)
- White nail polish
- Different colors for the ladybugs (blue, red, green, pink, purple, orange, etc.)
- Black nail polish (preferably a nail pen as it's easier to outline)
- Top coat
** As always, I feel the need to mention that it's not necessary to use all the same colors that I do, my tutorials are just for a basic reference to help stir your imagination! You can also use acrylic paints as an alternative to nail polish because there are a HUGE range of colors and each bottle is under $2! BUT, in my personal opinion I feel that nail polish lasts longer and doesn't chip or peel as easy as acrylic paint. **